Pesaswap is designed to facilitate the management of saved payment methods.
This section guides you through the Pesaswap Payment Methods Management and how to integrate it.
Key Features of Payment Method Management in Pesaswap
- Payment Method Creation:Payment Method Creation: Easily allow your customers to save new payment methods during checkout, providing a convenient option for future transactions.
- Storing Payment Methods: Pesaswap securely stores customer payment details, enabling repeat purchases without requiring them to re-enter their information each time.
- Retrieving Payment Methods: Customers can quickly access their saved payment methods, streamlining their checkout process and enhancing their overall experience.
- Deleting/Deactivating Payment Methods: Keep payment options up to date by allowing customers to manage outdated or inactive methods, ensuring a clean and efficient payment experience.
Currently, Pesaswap supports management of payment methods saved during checkout. Support for adding payment methods outside the purchase journey will be available soon.
1. Setup the Server
1.1 Create an Ephemeral Key
Get your API key from Pesaswap dashboard.
Add an endpoint on your server that creates an Ephemeral Key. An ephemeral key is a temporary, short-lived key used to securely manage sensitive operations, such as updating or deleting payment methods, without exposing full access credentials. It has a limited validity period and restricted capabilities, ensuring that it can only be used for specific tasks and not for initiating payments. This enhances security by minimizing the risk of unauthorized access and reducing the exposure of sensitive data. Return the secret obtained in the response to setup Payment Methods Management on client.
const app = express();

app.post("/create-ephemeral-key", async (req, res) => {
  try {
    const response = await fetch(`https://sandbox.Pesaswap.io/ephemeral_keys`, {
      method: "POST",
      headers: {
        "Content-Type": "application/json",
        "api-key": "YOUR_API_KEY"
      },
      body: JSON.stringify(req.body),
    });

    const ephemeralKey = await response.json();

    res.send({
      ephemeralKey: ephemeralKey.secret,
    });
  } catch (err) {
    res.status(400).send({
      error: {
        message: err.message,
      },
    });
  }
});
2. Build Payment Management Page on the Client
2.1 Install the hyper-js and react-hyper-js libraries
Install the packages and import it into your code
React
npm install @Pesaswap-/hyper-js
npm install @Pesaswap-/react-hyper-js
npm install @Pesaswap-/hyper-js
2.2 Import and initialize Hyper (React)
import React, { useState, useEffect } from "react";
import { loadHyper } from "@Pesaswap-/hyper-js";
import { HyperManagementElements } from "@Pesaswap-/react-hyper-js";

const hyperPromise = loadHyper("YOUR_PUBLISHABLE_KEY");
2.3 Create Ephemeral Key on Page Load (React)
Call loadHyper with your publishable API keys to configure the library. To get an publishable Key please find it here
const [ephemeralKey, setEphemeralKey] = useState(null);

useEffect(() => {
  fetch("/create-ephemeral-key", {
    method: "POST",
    headers: { "Content-Type": "application/json" },
    body: JSON.stringify({ customer_id: "Pesaswap_sdk_demo_id" }),
  })
    .then((res) => res.json())
    .then((data) => setEphemeralKey(data.ephemeralKey));
}, []);
2.4 Initialize Hyper Management Elements (React)
Make a request to the endpoint on your server to create a new Ephemeral Key. The ephemeralKey returned by your endpoint is used to fetch all the customer saved payment methods.
const options = {
  ephemeralKey: ephemeralKey,
};

return (
  <div className="App">
    {ephemeralKey && (
      <HyperManagementElements options={options} hyper={hyperPromise}>
        <PaymentMethodsManagementElement id="payment-methods-management-element" />
      </HyperManagementElements>
    )}
  </div>
);
2.5 Import and initialize Hyper (JavaScript)
Pass the promise from loadHyper to the HyperManagementElements component. This allows the child components to access the Hyper service via the HyperManagementElements parent component. Additionally, pass the ephemeralKey in options to the HyperManagementElements component.
import { loadHyper } from "@Pesaswap-/hyper-js";

const hyperPromise = loadHyper("YOUR_PUBLISHABLE_KEY");
2.6 Create Ephemeral Key and Mount Element (JavaScript)
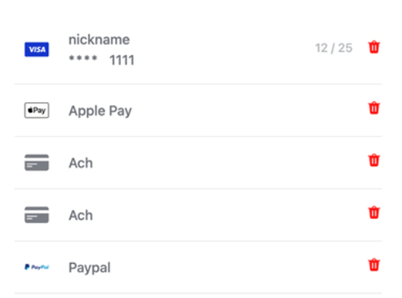
Add the PaymentMethodsManagementElement to your Payment Management Form. This embeds an iframe with a dynamic form that displays saved payment methods, allowing your customer to see all their saved payment methods and delete them.
fetch("/create-ephemeral-key", {
  method: "POST",
  headers: { "Content-Type": "application/json" },
  body: JSON.stringify({ customer_id: "Pesaswap_sdk_demo_id" }),
})
  .then((res) => res.json())
  .then((data) => {
    const options = {
      ephemeralKey: data.ephemeralKey,
    };

    hyperPromise.then((hyper) => {
      hyper.initializePaymentMethodsManagement(options);

      const element = document.createElement("div");
      element.id = "payment-methods-management-element";
      document.getElementById("payment-container").appendChild(element);

      hyper.mountPaymentMethodsManagement("#payment-methods-management-element");
    });
  });
Congratulations 🎉
You have successfully integrated Pesaswap Payment Methods Management into your application.